This hour-long test measures your performance across 4 separate maximal efforts to create a comprehensive 4-Dimensional Power Profile, assign you a rider type, and personalize the power targets in your workouts. The information and tips in this article will help you get the most accurate Full Frontal results.
Level Mode
If you're using a smart trainer, you will need to select Level Mode and an appropriate level. Please check out this link for all the details: A Guide to using Level Mode.
We recommend using Level mode for a few workouts before attempting the Full Frontal test, ensuring that you're comfortable with the gearing necessary to produce the required power.
Preparing for the test
To ensure that you're adequately rested and primed for your best results, we've created a 7-day training plan to get you ready. Head over to the Training Plans section in the app and apply this plan. Be sure to complete some of the workouts in Level mode! Any practice using this mode will be beneficial to you. We do not recommend doing Full Frontal as your first workout in the app.
Get your head in the game
You’ve prepped your body, but physical preparation is just one part of the equation. Your mental preparation is even more critical. Full Frontal isn’t your typical fitness test. You’ll be asked to dig deep, dig deeper, and then do it again. You need to commit to giving everything you’ve got, push yourself to the absolute limit and find out what you’re truly made of. To get in the proper mind state, we recommend completing the pre-workout Focus Exercise that’s part of The Mental Training Programme in the app. It will help you push away distractions, concentrate on the task ahead, and get you focused on delivering the performance of your life.
Pacing the test
Proper pacing during each of the efforts is going to be critical to get the most accurate results. If you don’t have much experience with fitness tests or in pacing all-out efforts like time trials, it might take a little practice. Don’t worry; we have a few tips and tricks to help you get the best data out of your Full Frontal examination.
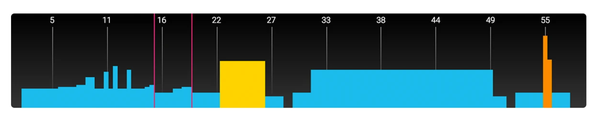
Here’s what the test looks like and how best to approach each of the sections:
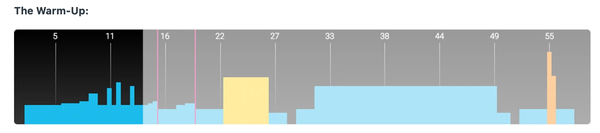
The easy, progressive warm-up features a couple of moderate-intensity efforts to get your legs and cardiovascular system ready for what lies ahead.
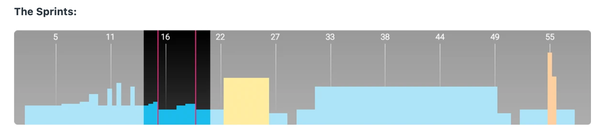
Once you’re primed, it’s time to get down to business. The first part of the test is designed to measure your “Neuromuscular Power”, or NM. This is your maximal 5-second sustained power, your sprint. The key to getting the highest numbers possible is to find the perfect balance between resistance and cadence, force and velocity. Power is affected by both. Spin too fast and you won’t generate sufficient force. Grind it out and you won’t get sufficient velocity. If you’re an experienced rider, aim for a cadence in the 100-110 rpm range. If you’re new to cycling or don’t have that many miles in your legs, aim for 90-100 RPMs.
The model of trainer you’re using can also affect how you go into these sprint efforts. If you have a trainer where the resistance ramps up as you increase your cadence, start at around 90-95 rpm so that you hit 110 rpm right at the end of the effort. If your trainer has a less dramatic change in resistance, you may need to start in a harder gear and a lower cadence so that you hit 110 rpm by the end of the effort without spinning out. If you’re not sure, then try a few sprints on your trainer before undertaking the fitness test, so you know just how to handle it.
You’ll have two chances to unleash your devastating sprint, so if you didn’t quite nail it on the first, you have a second chance.
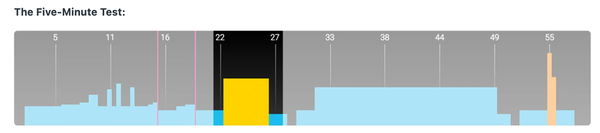
After an all-too-brief recovery period, you’ll head into the second part of the test: a 5-minute maximal effort that tells us your Maximal Aerobic Power, or MAP. MAP can vary dramatically between athletes with the same FTP. The key to this effort is being smart about pacing. If you think going too hard out of the gate on a 20-minute FTP test is unpleasant, this will make you rethink what unpleasant truly means.
A well-paced 5-minute effort is one where 2.5 minutes in, you start thinking, “I might just be able to hold this, but it will be close.” If you get to the 2-minute mark and start questioning whether you’ll make it out alive, you went out a little too hot. If you get to the 3-minute mark and think, “I have some energy left in the tank, I need to up the pace,” then you didn’t start out hard enough. That said, starting a little bit easier will get you closer to a perfectly paced 5-minute effort than blowing up spectacularly 3 minutes in.
As far as cadence goes, your best bet is to be a little higher than what you consider your “optimal cadence”. If you normally sit at 90 RPM for hard efforts, ramp it up to 100 RPM. Remember, you still have a 20-minute effort and a 1-minute all-out effort on deck after this. If you’re grinding out a big gear at a low cadence, you can very easily thrash your legs, which will make the next effort that much worse.
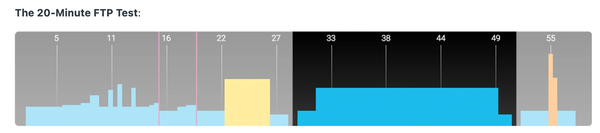
After just the right amount of recovery, you get to dive into that stand-by of the old FTP test, the 20-minute, all-out effort. After those two sprints and that 5-minute effort, your legs aren’t going to feel as fresh as a daisy exactly, however, so you will NOT be able to hold the same power as you would in a 20-minute FTP test like Rubber Glove. Unlike other tests, we will calculate your FTP on the full average of your 20-minute effort, rather than 95%. But to be accurate, you have to go all-out on the 5-minute effort that precedes it. Sandbagging any part of this fitness test will skew the results and negatively impact your rider profile and subsequent workouts.
Your performance in the 5-minute effort will also give you a good idea of how you should pace the 20-minute portion of the test. For the first 10 minutes, you should aim for 80% of the power you held for the 5-minute effort. So if you averaged 250W for the 5min effort you would want to start this effort at 200W. Once you hit the halfway point you can increase or decrease your pace depending upon how you’re feeling.
20 minutes isn’t a flash in the pan, so settle into whatever cadence you consider optimal. For newer riders that will be a bit lower, somewhere around 75-80 RPM. More experienced riders should aim for 95 RPM. Again, your muscles can only handle so much load, so if you find you get to the end of longer efforts and your legs are burning but you aren’t gasping for air, you need to focus on pedalling faster. This isn’t weight lifting.
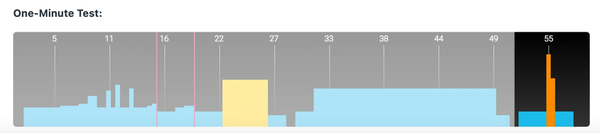
You’ve made it through the longest part of the test. Now, after a solid recovery, comes the piece de resistance: a final, 1-minute, all-out effort. 1 minute. 60 measly seconds. How bad can it be? In Revolver you do 15 (sorry....16) of those without giving it a second thought. But let’s be honest: this is going to hurt. You’ll be tired, your legs and lungs will be burning, your eyes will be bleeding, and you will just want to be done. But you’re a Sufferlandrian. You can dig deep into the Courage mines and give one last, glorious effort. It won’t be the greatest 1min you ever do, but it is important. This will show us your Anaerobic Capacity (or AC). This is what determines how much you have “left in the tank” at the end of a hard effort. The best pacing strategy for this one is to hit roughly 2x your 5min power for the first 10-15 seconds and then just try and hold on for dear life. Unlike the 5min or 20 min efforts, a well-paced 1-minute looks like a slight peak and fade. Some athletes will get out of the saddle for the first 15-20 seconds, sit down for another 20-30 seconds, and then spend the last 15-10 seconds out of the saddle to really get everything out.
Since this is a shorter effort, a higher than “optimal cadence” is recommended. Your legs will be thoroughly shot at this point, so don’t expect to hit 130 RPM or put that hamster in Violator to shame. Just remember that the lower your cadence, the more force you have to put out on each pedal stroke. Also, since this is not an evenly paced effort like the other parts of the test, your cadence will likely vary as you struggle to find a gear that feels “good”.
And that’s it. You just smashed the most devious—but most thorough—power profiling and fitness test out there. Once your eyes stop bleeding and you can see again, you’ll be able to review your Four-Dimensional Power Profile. In addition to detailed information on your performance, you’ll also be assigned a rider type: Sprinter, Pursuiter, Attacker, Time Triallist, Climber, or Rouleur. Easy-to-read graphs will show you exactly what your strengths are, and where you could use improvement. Your training plans will be tailored to your rider type, making your training as effective as possible.